

Optimize Your Analytics: A Step-by-Step Guide to Creating a GA4 Account and Configuring GA4 with GTM

In this blog, we will try to understand how to create a GA4 account and how to configure GA4 in GTM.
Let’s understand in a nutshell, what is Google Analytics and how it works!
Google Analytics is a platform that gathers information from your websites and apps. It then generates reports to help you understand how your business is doing.
The initial step involves creating a GA4 account. Let’s get started with that!
Note:
- Make sure you already have a Gmail account. Your GTM and GA4 accounts should be set up using the same Gmail ID for a smooth experience.
- If you have already established your GTM account, well done. However, if you haven’t done so yet, I’ve prepared a comprehensive step-by-step guide. Please review it by following the link provided below:
Unlocking Website Insights: A Simple Guide to Setting Up Your GTM Account and Installing the Script
Step 1: Simply click on the “Get Started” link to open the GA4 page. Once there, click on the Get started today button:

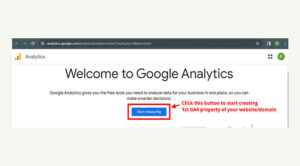
Step 2: Begin by clicking on the “Start measuring” button to kick off the process of creating your first GA4 account :
Step 3: This step presents a straightforward form for setting up your GA4 account. You can have multiple data sources within a GA4 account. Just enter the account name, in my case, it’s ‘Demo GA4 Account,’ and click on the ‘Next’ button.

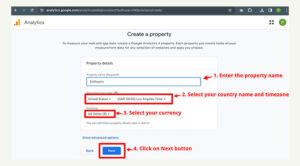
Step 4: In this step we will create GA4 property by filling the simple form. This property will hold all the measurement data of your website or app.
Step 5: Now, let’s move on to the next step, where you’ll need to share details about the type of industry you’re in and the size of your company

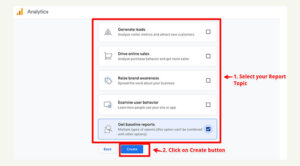
Step 6: In GA4, you get to pick the topic of a report based on your business goals. To keep things simple in this guide, let’s go with ‘Get baseline reports.
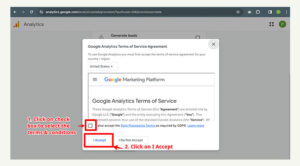
Step 7: Accept the Terms & Conditions
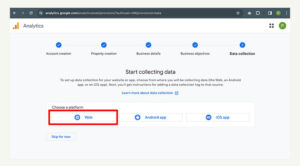
Step 8: In this step, we just need to let GA4 know where we’ll be gathering our data from. Is it from a website, an Android app, or an iOS app? In our case, we’ll choose the Web.
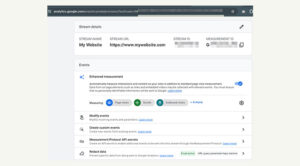
Step 9: In this step, we’ll input details about the data stream where GA4 will collect event data. Here’s what you need to do:
- Add your website URL.
- Provide a Stream name, which could be your website name.
Moreover, GA4’s Enhanced Measurement feature allows automatic tracking of various website interactions. If you’ve installed Google Tag Manager (GTM) on your website and successfully configured GA4 within GTM, it will automatically collect data for the following events without the need for additional tags:
- Page views
- Scrolls
- Outbound clicks
- Site Search
- Video engagement
- File downloads
- Form interactions
You can manage these automatic events by toggling them on or off through the gear icon.
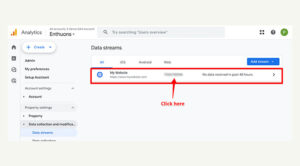
You’re almost there! Just one more click to complete your GA4 account creation. Simply click on the ‘Create stream’ button, and you’re done!

Congratulations! You just completed the steps of creating a GA4 account and data stream.
Now, let’s go to the final steps of setting up our Google tag in GTM. This will link our GA4, allowing the data stream to start sending event data to our GA4 account.
What is Google Tag?
Google Tag ensures that data flows smoothly from your website to Google Analytics and any other destinations you’ve configured.
If you haven’t set up your GTM account yet, no worries! Follow the guide below for step-by-step instructions on how to create a GTM account and install the GTM script on your website:
Unlocking Website Insights: A Simple Guide to Setting Up Your GTM Account and Installing the Script
Step 10: Assuming you’ve already set up your GTM account using the same Gmail ID as your GA4, open your GTM account and click on Tags

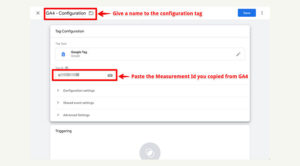
Step 11: In this step, we’ll create our GA4 configuration tag. Simply click on New

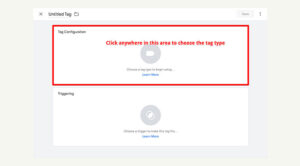
Step 12: To choose the type of tag you want, click anywhere on the screen. For instance:
- If you want to send data to GA4, select ‘Google Analytics’
- If you’re aiming for conversion tracking data from your Google Ads campaigns, choose ‘Google Ads,’ and so on.
Step 13: In our case we will choose Google Analytics as Tag type:

Step 14: When you click on ‘Google Analytics,’ a new window pops up. In this window, choose ‘Google Tag’ because we’re configuring GA4 in GTM. Rest of the time, while setting up GA4 events, we will select Google Analytics : GA4 Event

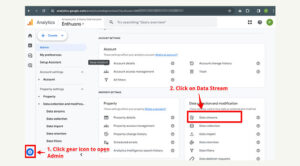
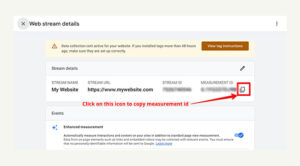
Step 15: Next, let’s head back to our Google Analytics panel and copy the Measurement ID. Here’s how you can find your Measurement ID:
- Open your Google Analytics you have just created
- Click on the gear icon located at the bottom left to open the Admin section
Step 16: Copy Measurement Id:
In next step we will open our GTM again
Step 17: In this step, we will be adding the Measurement ID in Google Tag
Trigger Creation: In this step we will be creating triggers. Before we set up the triggers, let’s understand what is trigger:
Think of triggers as specific conditions. If the condition is true, the tag will fire, otherwise the tag will not fire. Triggers are an integral part of tags. They give tags their purpose and make them work effectively.
Step 18: Now that we understand what triggers are, let’s go ahead and create a trigger for our Google configuration tag. Click anywhere in Triggers area:
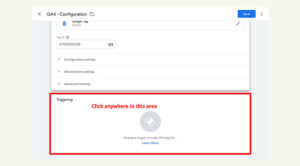
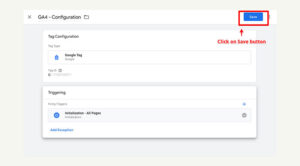
Step 19: After clicking in the trigger area, a window will appear for selecting the trigger condition. Choose ‘Initialization – All Pages’ because we want the Measurement ID to be initialized for all pages as soon as the user opens the website

Step 20: Click on Save button
Step 21: Preview and Debug the set up: The next step is to preview and debug our implementation. Click on Preview button:

Step 22: It will open a pop up. Enter your website URL. In my case, the website url is https://mywebsite.com/. Click on Connect button
After clicking the ‘Connect’ button, your website will open in a new tab, and you’ll see a small pop-up saying ‘Tag Assistant Connected’ on your website in that tab.

Step 23: Return to your Tag Assistant Tab. If you see results similar to the image, with your website connected. On the left side, you can see events, and in the body part, the tags you created are firing successfully. This indicates that the tags have been configured successfully.

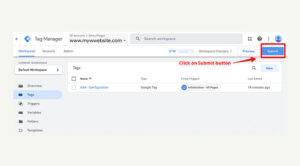
Step 24: Since everything is working fine, let’s move to the final step of publishing the container. Click on Submit button
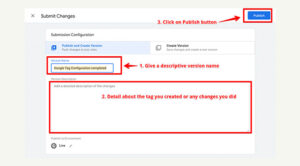
Step 25: Final Step >> A new window will appear. Give your version a descriptive name and provide a brief description of what this tag is for or any changes you’ve made. Remember, both the version name and description are optional. The last step is to click on the ‘Publish’ button. Wait a few seconds, and you’re all set!
Phew! That was quite a journey…
Congratulations! You’ve successfully completed the steps to set up your GA4 account and configure Google Tag in GTM.
Since we’ve already set up our GTM account and installed the GTM script on our website, and now with our GA4 account all set up, all that’s left is to sit tight and wait for the next 24-48 hours for the data to be recorded in your GA4 account. After 24 – 48 hours, you will start seeing data into Reports section of GA4

If you like video guides, here it is: